GOSH! Don’t remember when was the last time I logged into my blog! Last 10 days have been so hectic. What when you have every possible thing turning up, keeping you extremely busy, except the maid. With the visiting guests...extra work load in office and in the middle of all this the Maid doesn’t turn up for one entire week, without any notice :(
Not as if I kept busy 24 hours a day...In whatever little time I got, I have been reading ‘The Three Mistakes of my Life’ by Chetan Bhagat.
The maid turned up yesterday, so I am much more relaxed now. Oh what if she doesn’t end up again today (Its already 11:30 am and she isn’t in as yet!)
But in those last 10 days I would be looking for quick easy to make snacks after returning from work...that would last me till I could fix the dinner. One of these instantly made snack is Chilli Cheese Sandwich.
This sandwich doesn’t call for any preparation time, is done instantly... and leaves a nice chilly taste. This must be a Chennai specialty. I hadn’t tasted this anywhere before...you can find it almost everywhere here. Makes for a perfect quick snack.
Ingredients:
4 Slices of Sandwich Bread
2 Slices of Cheddar Cheese
2 Green Chillies chopped
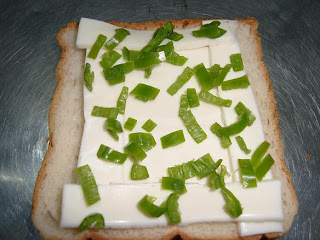
The pic is self explanatory. I folded the cheese slice at the edges to prevent it from flowing out when it melts.
Cover this with another slice. Similarly set other sandwich as well.
Heat the griller and place the sandwiches in.
Best enjoyed with some Potato Chips and Tomato ketchup.
Talking of it...My next post is going to be another quick snack.
Do you wanna take a guess at what this is? or what ingredients this calls for?
Monday, September 29, 2008
Wednesday, September 17, 2008
Bread, Can anything be simpler?
Last afternoon I was going through my bookmarked recipes, a bread recipe caught my fancy. Did I say Bread...naah, I meant the simplest bread recipe. There couldn’t be anything simpler than this. Very low chance of anybody going wrong on this one (I got it perfectly after all!). Oh BTW I was suppose to be trying pizza recipes, wasn’t I? Hmmm...that post is coming real soon too, since I have got a very good recipe for it.
Back to the bread...Have you ever thought what goes in making a bread …All Purpose flour (Maida) which is the basic ingredient, Yeast to make the dough rise, Salt for the taste and of course water to make a dough. This is where I would stop my thinking and would wonder what else goes in to making that perfect bread.
To my surprise that was all! Yes the 4 magical ingredients + some time and you are done. I came across this bread recipe on Siri’s corner and couldn’t believe that bread making could be so simple. You should also check out this, it has some very good lessons about bread making.
Ingredients:
1 1/2 All Purpose Flour (Maida)
1 tsp Active Dry Yeast
1 tsp Salt
½ + 1/4 Cup warm Water
In a bowl pour the ¼ cup water and add the yeast to this. Keep this to froth. Takes approximately 10 mins. Make sure the water is not too hot as this can destroy the yeast, it should just be warm enough to comfortably dip your finger in it.
In a mixing bowl sift the flour and add salt. Add the frothy yeast and ½ cup water. Form this into a dough. If required use some more water. We do not want the dough to be dry with lumps. Form nice soft dough for perfect bread.
On a lightly floured surface transfer the dough and knead till you get a smooth dough. This step takes around 10 mins.
What is the correct way to knead the bread dough, if this is the same question haunting you, you need not look any further. Check this video. Since Kneading is a very important step of bread making, it is important that you get this right,
Grease a big bowl with oil and transfer the dough in it. Pat some oil on the dough with your fingers. Cover with a cling film and keep it to rest in a dark, warm place. I always keep this in my microwave and if the weather is cool I heat the oven for a minute before placing the dough. Now see the yeast do its magic.
Wait till the dough has doubled. This has almost always taken 2 + hours for me.
Punch the dough down and knead again for 2 mins. This goes back again in the greased bowl and cover it. Let this rise for another 45 mins, it would be back to nearly double its size by now.
Take it out and shape roughly into a loaf. Make scores (cuts) with a sharp knife to help release the trapped gases. This will prevent the loaf from breaking. Preheat the Oven to 200 deg C.
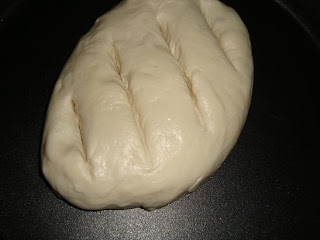
Just before putting the loaf to bake I brushed egg yolk on top of the loaf. Bake it for 30 minutes. Cool on a wire rack.
I don’t remember when was the last time I was relishing the bread as it is. I ate 2 slices without any butter or anything. It was so damn tasty. I loved it. It was no different from the bread I buy from the store every week.
Back to the bread...Have you ever thought what goes in making a bread …All Purpose flour (Maida) which is the basic ingredient, Yeast to make the dough rise, Salt for the taste and of course water to make a dough. This is where I would stop my thinking and would wonder what else goes in to making that perfect bread.
To my surprise that was all! Yes the 4 magical ingredients + some time and you are done. I came across this bread recipe on Siri’s corner and couldn’t believe that bread making could be so simple. You should also check out this, it has some very good lessons about bread making.
Ingredients:
1 1/2 All Purpose Flour (Maida)
1 tsp Active Dry Yeast
1 tsp Salt
½ + 1/4 Cup warm Water
In a bowl pour the ¼ cup water and add the yeast to this. Keep this to froth. Takes approximately 10 mins. Make sure the water is not too hot as this can destroy the yeast, it should just be warm enough to comfortably dip your finger in it.
In a mixing bowl sift the flour and add salt. Add the frothy yeast and ½ cup water. Form this into a dough. If required use some more water. We do not want the dough to be dry with lumps. Form nice soft dough for perfect bread.
On a lightly floured surface transfer the dough and knead till you get a smooth dough. This step takes around 10 mins.
What is the correct way to knead the bread dough, if this is the same question haunting you, you need not look any further. Check this video. Since Kneading is a very important step of bread making, it is important that you get this right,
Grease a big bowl with oil and transfer the dough in it. Pat some oil on the dough with your fingers. Cover with a cling film and keep it to rest in a dark, warm place. I always keep this in my microwave and if the weather is cool I heat the oven for a minute before placing the dough. Now see the yeast do its magic.
Wait till the dough has doubled. This has almost always taken 2 + hours for me.
Punch the dough down and knead again for 2 mins. This goes back again in the greased bowl and cover it. Let this rise for another 45 mins, it would be back to nearly double its size by now.
Take it out and shape roughly into a loaf. Make scores (cuts) with a sharp knife to help release the trapped gases. This will prevent the loaf from breaking. Preheat the Oven to 200 deg C.
Just before putting the loaf to bake I brushed egg yolk on top of the loaf. Bake it for 30 minutes. Cool on a wire rack.
I don’t remember when was the last time I was relishing the bread as it is. I ate 2 slices without any butter or anything. It was so damn tasty. I loved it. It was no different from the bread I buy from the store every week.
Friday, September 12, 2008
Til Chikki
I made Til Ki Chikki for everyone back home before leaving for Goa. This was my first attempt at making chikki...It was the simple recipe on Kailas Kitchen which got me into making it.
I followed her recipe word to word, hence am not posting the recipe. Just the final pic...
Vedict: Chikkis came out very crisp. Everybody at home loved the chikki, execpt that my MIL's tooth cap broke eating them ;)
My trip took me to Mumbai, Nasik and Pune before I actually reached Goa. We happened to be in Pune a day before the Ganesh festival. Huge pandaals were erected for the Sarvajink Ganesh...would have loved to click some pics, but the entire place was so crowded that standing at a place stationary to click a snap seemed quite a daunting task. I managed this one at a Ganesh shop
I visisted a few friends during the festival and clicked some pics...
On my way back via B'lore, was lucky to visit this sarvajanik Ganesh...
Subscribe to:
Posts (Atom)